Mobile Time Clock: Getting Started with Geofencing

Article Highlights:
- Increase timekeeping accessibility and mobility with Mobile Time Clock.
- Use geofences to establish functional boundaries for employee activity.
This article was written by Keren Pankey, a Software Education Representative.
There’s a new Timekeeping and Attendance application that increases accessibility at and away from the dealership: Mobile Time Clock. With the application, employees can clock in, clock out, and submit vacation requests conveniently from their mobile device. Supervisors can also access timecards from the app, with the ability to create, edit, and approve them.
Getting Started
If you want your employees to be onsite or at the dealership when they clock in, begin by establishing geofences. Geofences are virtual geographic boundaries, defined by GPS or RFID, that enable certain functions when mobile devices enter them. In this case, once an employee’s phone enters the geofence, functions like clock-in and clock-out are enabled.
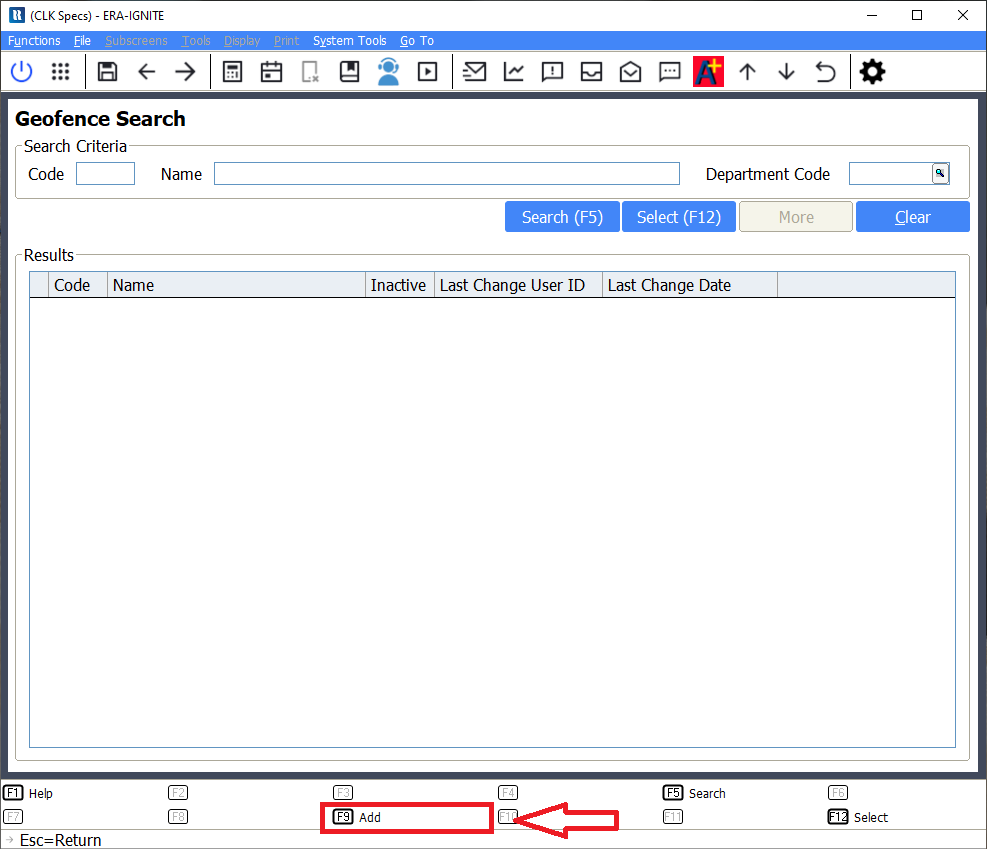
In the Geofence Setup Screen in Time Clock (Specs), you can create and maintain up to 50 geofences to account for your dealership’s different buildings and locations. To do this:
- Open the Time Clock (Specs) application and go to Geofence Setup. It is the last link on the main page or the last option in the Functions menu.
- Select F9 to create a new geofence.

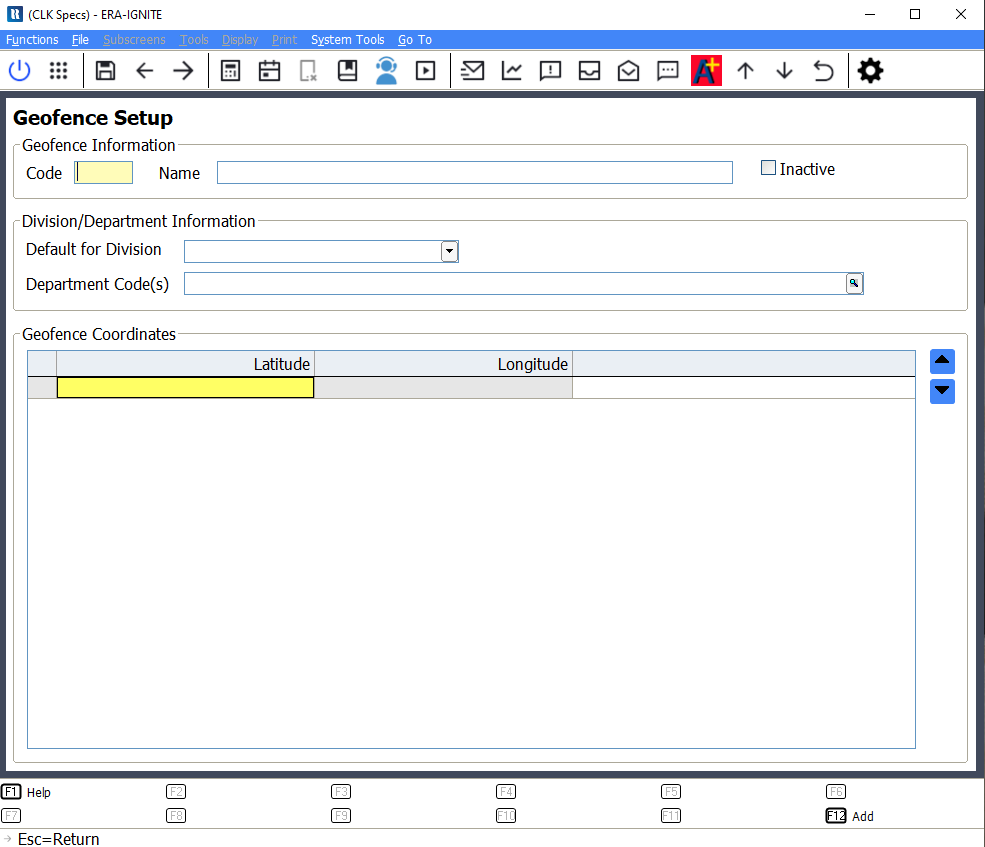
- Enter a Code and Name in the Geofence Information section to help you easily identify which location or building the fence is for.

- If a specific Division or Department will be using this geofence, this can be defined in the Division/Department Information If the geofence is more general for all divisions or departments, these fields can be left blank.
- You must enter a minimum of four coordinates in the Geofence Coordinates section. When entering latitude and longitude, use the coordinates for each point of the shape you want your boundary to be, whether it’s the edges of your property, a specific building, a vehicle lot, etc. The first and last entries should be the same, closing the boundary shape.
Latitude and longitude coordinates can be found using Google Maps. Right-click on the place or area of the map for the starting coordinates. A pop-up window will appear with the latitude and longitude. Continue this process for each point on the geofence until you have a complete shape.
- Save your geofence with F12 Add.
Assigning Geofences
For each employee using Mobile Time Clock, geofences will need to be assigned to their user ID. Here’s how:
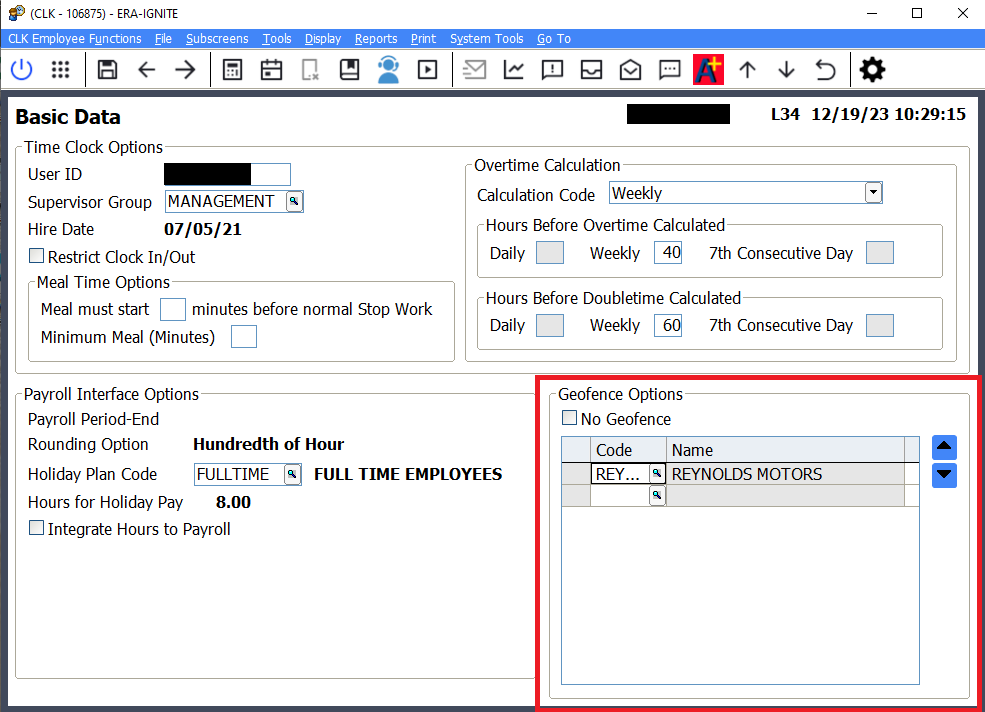
- Open the Time Clock application and go to Maintain Employees. Once here, search for and open the Basic Data

- At the bottom right of Basic Data, you’ll see Geofence Options. Here, you have two choices.
- Enter the code for the appropriate geofence for this employee.
- Select the No Geofence checkbox. This checkbox allows the employee to use the app without geofence limitations. Selecting No Geofence can be useful for employees who work on the road, at home, or at a location without an established geofence.
- Save your changes with F12 Update.
What if my employees work at multiple dealership locations or buildings? Don’t worry, up to 50 geofences can be added to their basic profile.
Mobile Time Clock can be downloaded from the Apple Store or Google Play Store. Moving the Time and Attendance application into the pockets of your dealership employees will create an easier timekeeping experience. Within the geofence? Ready, set, punch!
For more education and training, check out Reynolds Software Education.
Related Articles:

Visual Learner? Help videos are available in ERA-IGNITE to assist you.
Prefer to learn from watching a video rather than reading a manual? Check out ERA-IGNITE Smart Center to jumpstart your learning.

Track Your Contracts in Transit With the Heat Sheet
One of the most important metrics you monitor in F&I is your contracts in transit. With ERA-IGNITE F&I Heat Sheet, tracking your funding is simplified.

Configuring Posting Screens in ERA-IGNITE Accounting
If most of your day is spent posting to the journal, try starting in posting mode instead of starting in search mode.

Tips and Tricks for Desking
Navigate the Desking application easier with these tricks.


